
Are you curious about card making but not sure where to begin? You’re not alone—and I’m here to help! Whether you’re looking to send a handmade birthday card or just want a fun creative hobby, getting started is easier than you think. Let’s break it down into the basics.
🛠 The Essentials:
1. Cardstock
Your foundation is cardstock. I recommend starting with thick white cardstock for sturdy card bases. If you’d like colored card bases, the regular-weight card stock works well too. You can mix and match as you grow your collection.
2. Paper Trimmer
A paper trimmer is key for clean, even cuts—and it makes measuring super simple. I use one that includes a scoring blade, which is great for folding your card base neatly. Pro tip: If your blade starts to dull, try cutting a sheet of tinfoil to sharpen it!
3. Adhesive
You’ll need something to hold everything together!
- My favorite is multipurpose liquid glue because it gives you time to adjust pieces before it sets—especially helpful for layered or textured (embossed) cards.
- I also use Stampin’ Seal, a tape runner that’s perfect when you’re confident about placement. It’s especially good for adding ribbon. Both adhesives are reliable, so pick the one that suits your style (or try both!).
4. Stamps
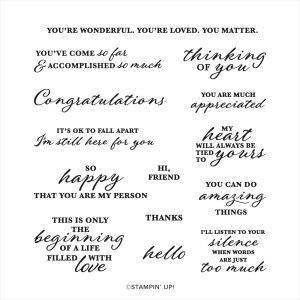
Start with a basic sentiment stamp set. The Choose Happy or Wonderful Thoughts stamp sets are great options— they cover most occasions and one includes a few simple images that are perfect for beginner cards. You’ll be amazed how far one good stamp set can take you!

🧰 A Few More Must-Haves:
5. Acrylic Blocks
To use your stamps, you’ll need some acrylic blocks. These clear blocks let you see exactly where you’re stamping for perfect placement every time.
Stampin’ Up! always lists which block sizes are best for each stamp set—but don’t worry, you don’t need every size! Smaller stamps will still cling to larger blocks just fine. You can purchase blocks individually or as a full bundle, depending on your needs and budget.
6. Ink Pads
Of course, you’ll need ink!
I recommend starting with a basic black ink pad—it’s what I reach for most often. It gives a crisp, clean image and works with just about any design. Once you’re more comfortable, you can explore different colors and specialty inks.
7. Stamp Cleaning Tools
Keeping your stamps clean will help them last longer and give better impressions. Here are a few popular options:
- Baby wipes – quick and convenient, though they can leave behind fibers.
- Stamp Scrubber + Stampin’ Mist – a handy tool for easy, thorough cleaning. Just spray and scrub.
- Stamp Shammy – this one is super popular among crafters. Just add water, then wipe stamps on the shammy.
8. Envelopes
You’re going to want to send those gorgeous handmade cards—so don’t forget envelopes! Basic white A2 envelopes are perfect for standard-sized cards, and they can even be dressed up with a little stamping or patterned paper for a custom look.
The Basic Supply list…
🎨 The Fun Part—Adding Color & Style!
Now comes the creative part—where you can really start making each card your own!
A great place to start is with Designer Series Paper (or DSP), which is what Stampin’ Up! calls its beautiful patterned paper.
Here’s why I love it:
- It’s double-sided, giving you twice the options.
- It comes in both 12″ x 12″ and 6″ x 6″ sizes.
- Most importantly: it’s all coordinated!
Each DSP pack tells you exactly which Stampin’ Up! colors coordinate with it, so you can easily find matching cardstock, ink pads, markers, ribbon, and embellishments. No guesswork. No clashing. Just beautifully coordinated cards, every time!
This takes the pressure off if you’re nervous about mixing colors or choosing supplies—and it helps your finished card look polished and put-together.
I’ll be sharing plenty of inspiration, ideas, and simple card layouts using these supplies—so if you’re enjoying this, please consider subscribing to stay in the loop with all things stampy!
(Yes, I made that word up… but I think we should make it a thing!)


 Laightest Designs
Leave a comment